31 July 2014

Slow cooked chicken

Last week I said I'd write about a chicken meal for the slow cooker, so here it is. I cooked mine in a cast iron pot in the oven because I left it too late for the slow cooker - it needs at least four hours and  I only had two. The recipe is the same though and I hope you enjoy it. It will serve four to six adult portions and, as usual, you can use whatever vegetables you have in the fridge. I've given the oven cooked and the slow cooker instructions, so watch out for the points of difference as you read.


Get yourself a free range or organic chicken, or better still, one of your own meat birds, and make sure there is nothing in the cavity. Wipe the skin dry and place the whole bird in a lightly oiled pot to brown. Don't skip this step, it's what gives the chicken the depth of flavour it will develop during the cooking.


While the chicken is browning, chop up one onion, one clove of garlic, two carrots, three sticks of celery and some mushrooms. When the chicken is brown on both sides, remove it from the pot and add all the vegetables.  Brown them for five minutes.

While the vegetables are browning, organise your spices.  I used cumin seeds, dried chilli and paprika as well as finely chopped flat parsley from the garden.  If you have to grind the spices, do that now. 

You can use any vegetables you have in the fridge - but do use onion as it gives the meal a good foundation. You can choose your own spices and herbs too. Use what you have on hand. If you enjoy curried chicken, this is a good way to make it when you don't have a lot of time. Add your favourite curry paste or spices, let them toast for a while, then add the water. Chicken is a very versatile meat and will team up well with many flavours.


When the vegies have developed some colour, add the spices and stir them around with the vegetables to toast. This will bring out their natural flavours. Add two dessertspoons of plain/all purpose flour and stir in. Add one litre/quart of water and stir. When that's done, add the chicken back to the pot, season with salt and pepper and mix it all together. If you're using the slow cooker, this part of the cooking is now done.

If you're going to cook this in the oven, it will need more water than the slow cooker version so pour over another litre/quart of water.  You don't need to use stock for this - the water will turn into stock while it's cooking the chicken and vegetables. Mix it all together.


You can prepare everything to this point the day before and store it in the fridge. You don't have to but if it will be easier for you to do it in two batches, this is where you end the first batch.

If you're cooking it in a slow cooker, pour the contents of the pan into the slow cooker and start it on the low setting. It should cook for at least four hours but it will bubble away nicely, developing flavour, all day.

If you're cooking it in the oven, put the lid on the pot and place it in a medium oven, around 165C/320F for about two hours. If you only have an hour, set the oven to 200C/390F to cook it faster.  Slow cooking will develop more flavour.


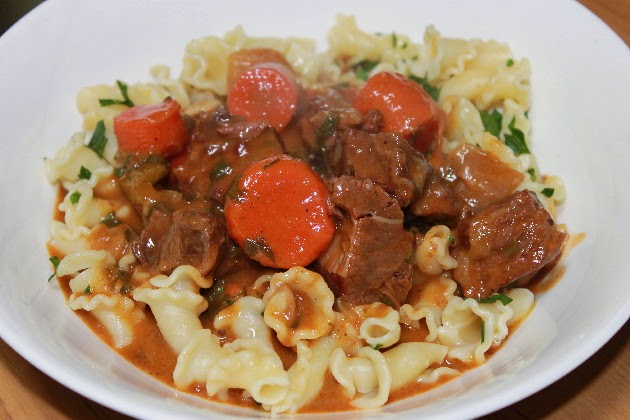
When it's finished, add two spoons of sour cream (optional), and serve it with potatoes, or rice if you made a curry. The meat should just fall from the bone.

Please note: if you use chicken pieces or chicken breasts for this recipe, don't cut them up. Slow cooked chicken will dry out if it's in smaller pieces. If you need to serve smaller pieces, cut them after cooking.

This is a good hearty family meal and just right for a mid-week meal when you're working throughout the day. If you can manage to do the preparations the evening before, you just pop  it into the slow cooker before you go to work. I hope you enjoy it.


SHARE:

29 July 2014

What I've been part of


Every so often Hanno and I leave our chores behind and go out for the day. We like to take the back roads, we stay away from crowds and shopping centres and we usually end up at a quiet spot where we look around, have lunch and a cuppa and then travel back home again. Yesterday we went to Tin Can Bay and we took Jamie with us. :- )


Looking after small children on an outing doesn't change much. There is generally a basket containing a water bottle, juice, sultanas, fruit, a hat, a little bag of favourite small toys and a set of spare clothes, just in case. The other things that don't change are the little songs, the questions and the tiny fragments of life that might seem so ordinary they aren't all that special. But looking at it all from a grandma's eye, it's all extraordinary, charming and the stuff that melts even the coldest heart.


I know Jamie won't remember that trip for more than a few days but I'll remember it until I take my last breath. I'll store the memory away with all the others I have of Shane and Kerry, of Alex, of Sarndra and Sunny, of Jens and Cathy, of Tricia, my nephews and their babies, and my mum and dad. All those memories are the precious articles I take out to examine in the wee small hours of the morning or when I'm sitting in the garden and it looks like I'm gazing at a kookaburra or a far off tree. Those are the times when I'll see Jamie on his bike again, and I'll hear him singing and calling me grandma, surely the sweetest sound I know, and it will remind me of how well I have lived and what I've been part of.

SHARE:

28 July 2014

How to make soap - new recipe

This is the soap made last week using calendula-infused oil.

I love making soap. It's another piece of the self-reliance puzzle and it makes sense to me to put time into this very old craft. Hanno and I both have dry, sensitive skin so we make sure we use soap that nourishes our skin. The soap I usually make has four ingredients, commercial soap contains many more than that. Shower gel is no better. The trouble with most commercial soaps is that they use man-made ingredients instead of natural ones and they remove most of the glycerin from the soap. Glycerin is the moisturising part of soap but it's removed in the commercial soap making process and then added back in much smaller amounts. Glycerin is more expensive than soap is so it's often sold as a separate product to make a greater profit. What's in your soap?  A list of soaps and their ingredients. This list is from the USA but it would be very similar in Australia and Europe.

Your skin is your body's largest organ. What you put on your skin has the potential to heal or harm. I want to use products that at the very least, don't hurt me, and at their best, provide nourishing care for my skin and make me feel clean and cared for.

I hope I can encourage you to make your first batch of soap. But I have to start off with a warning. It can be dangerous because the caustic soda/lye you use will burn if you spill it. If you make soap when you're alone, with no children or animals around, you'll be able to focus all your attention on it and if you have the capabilities and intelligence of the hundreds of thousands of people who made soap before you did, you'll be fine. The danger point is mixing water with the caustic soda - the combination of those two elements will cause the mixture to heat up, even though it's not on the stove. Fumes will come off the mix so you must carry out that stage with doors and windows open. When the caustic soda/lye is mixed with the oils, the danger period is over, although the soap mix will still be slightly caustic.  It sounds like something to be wary of but if we were together in your kitchen making soap, I'd simply say to you to be careful and I'd watch to make sure you were. Before and after that mixing of the caustic soda/lye, it's simply a matter of measuring and mixing.


Those who know me well know that once I happen upon something that works well for me, I almost never change it. Well, I'm not exactly changing my tried and tested soap recipe, but I am adding one ingredient to it. It's something I grow in my back yard - organic calendula petals. I add them in the forum of calendula infused olive oil. I am making a couple of batches of it because I like to use the fresh petals. I'll store that oil in the fridge to be used when I make soap again. I have no doubt that I'll dry some petals too, probably when it gets closer to the end of their season, so I'll have my own petals on hand and don't have to buy them.


Making calendula infused oil is quite simple. Early in the morning, after the dew has dried on the petals and after the bees have visited, but before the sun is high, pick the flower heads. This is when the oils in the flowers are at their best. Picking calendula flowers stimulates the plant to produce more so you can repeat the picking process every week until you have enough petals. Healing properties of calendula.


This is my new soap recipe:
450 mls/15.2 liquid oz of rain water, spring water or distilled water * 
172 grams/6.06 oz caustic soda/lye 
750 grams/26.5 oz olive oil
250 grams/8.8 oz calendula infused olive oil
250 grams/8.8oz copha or coconut oil

* If you don't have rain, spring or distilled water, collect enough tap water the day before you make the soap and leave it on the bench to sit. That will allow the chlorine in the water to evaporate off.

All the instructions and equipment you'll need to make soap is listed in this post. Please read the entire post before going ahead, then come back here for the new recipe. Or if you have no infused oil, use the old recipe until you have time to make infused oil.


When the soap mixture progresses from being liquid to a thicker consistency which holds a shape on the surface, the soap is ready to go into the moulds. This stage is called trace.


When the soap is made and poured into moulds, it needs to be kept warm for as long as possible. This (above) is how I do that. I place the moulds on a large board and cover the tops with plastic wrap, then cover that with a towel and wrap the entire thing in a woollen blanket. It sits on top of my freezer until the following day when I take the soap out of the moulds.

This soap can also be used for washing your hair and you don't need to use hair conditioner with it. I've used it for years and it's always made my hair shiny and healthy. Homemade soap is also a great gift. A bar of soap and two hand knitted face cloths is a beautiful gift that most people would love to receive. But I think the biggest benefits to making your own soap is knowing how few ingredients go into is and experiencing the nourishing qualities of the soap on a daily basis. And if you doubt that is a benefit, have a look at the list of ingredients on any supermarket soap.

I hope you take some time to learn the skill of soap making. Buying commercial supermarket soap will give you a lot more chemicals than it should and buying natural soap is expensive. Making your own from scratch is a natural progression in your simple life journey, so when you're ready to take that next step, I encourage you to dive right in. 
SHARE:

25 July 2014

Weekend reading

We have an abundance of wildlife here. I was working at my computer yesterday when a kookaburra swooped down to drink at the water bowl. The things I see from my window!

I hope you have a wonderful weekend.  Take some time to slow yourself and take some deep breaths. See you next week!

Reclaiming our real lives from social media  and this includes blogs :- )
I'm in love with New York but I know how lucky Australians are
Leisure time on an average day
Getting over procrastination
Giant knitting
Crocheted fruit shoes  :- )
Make a rag rug
DIY skills to pass on
How to run a craft business
Top tips for selling craft online
Building up a healthier pantry

===♥︎=♥︎=♥︎===


SHARE:

23 July 2014

Bread - a five minute loaf

What's not to love about bread? Well, maybe I should clarify that statement somewhat - what's not to love about good wholesome bread. The common, plastic-wrapped, supermarket loaf does not have any part in this post. I'm talking about homemade rye bread today and the common supermarket loaf is about as far away from homemade rye as it could be. This rye loaf will give you good nutrition, complex carbohydrates, high fibre with a low glycemic index, as well as many vitamins and protein. There are a few types of rye bread. My favourites are pumpernickel, which is 100% rye, and this loaf which is 75 percent rye flour and 25 percent unbleached white flour/wholemeal wheat flour. If you're buying bread flour for the first time, buy it in small quantities until you find type of bread you like, then buy flour for that type of bread. If you're buying rye flour, look in the shop for caraway seeds too and get 15 - 30 grams if they're there. Caraway is the traditional seed used with rye and it's a marriage made in heaven.


Many people are put off making bread because they believe it is difficult and time consuming. This bread is called five minute bread because you'll only be working on the dough for five minutes. Making good bread is certainly a skill, but it's just a matter of learning how and then practising enough to perfect it. This bread is a very good loaf to start off any new baker because there is almost no kneading and there are few ingredients. Here they are:

Ingredients:
  • 2 cups rye flour
  • 1 cup white or wholemeal wheat flour
  • ¼ teaspoon dry yeast
  • 1 teaspoon salt
  • 1½ cups warm water If you have to add slightly more water to get a moist dough, do so. The amount water you use will depend on the type of flour you use, and your climate. Flour is affected by humidity so you'll use less water in humid weather. 
You can make this bread using all white bread flour or any mix of bread flours, just make sure it's three cups in total.

Equipment:
  • large mixing bowl
  • measuring cups and spoons
  • Dutch oven or covered cast iron casserole pot. This provides the ideal conditions for cooking the loaf.
Time frame:
You'll need to make the dough about 12 hours before you want to bake the loaf. I usually make my dough late in the afternoon on the day before I want to bake it.

Your time periods will be:
Making the dough - about three minutes, at least 12 hours before you intend to bake the loaf.
Shape the dough - one minute, one hour before you intend to bake.
Place the dough in the pan to bake - less than a minute.

Baking will take about 30 - 35 minutes.
  • Late in the afternoon on the day before you want the bread, take a large bowl and measure in three cups of flour, ¼ teaspoon of dry yeast and a teaspoon of salt. Mix the dry ingredients together. Add 1½ cups water and mix the ingredients together with your hands until all the flour and water have mixed together completely. This mixing (not kneading) will take less than a minute. Just continue mixing the dough with your hands until all signs of dry flour have gone.
  • Cover the top of the bowl with plastic wrap and leave the bowl on the kitchen bench overnight.
  • The next day, about an hour before you want to bake the bread, sprinkle a small amount of flour onto your clean kitchen bench. Tip the dough out onto the floured surface. At this stage it will look like a sloppy mess.
  • Take the top portion of the dough (at 12 o'clock) and fold it down onto the bottom portion (6 o'clock) and push in with the base of your hand. Turn the dough slightly and repeat the folding from top to bottom for about a minute or until the dough is smooth and you can shape the dough into a smooth round ball - see below.
  • Move the dough ball to a clean tea towel sitting inside the mixing bowl, cover the dough with the tea towel and let it sit there to rise for about an hour - see below. If you have caraway seeds, or want to add seeds, oats or polenta to the top of the loaf, wet the top of the dough and sprinkle it on.

  • Fifteen minutes before baking, place the cast iron pot and lid in the oven and turn the oven on to the top temperature - I use 230C/445F. 
  • Just before you place the dough into the baking pot, clip the top of the dough with scissors or slash the dough with a very sharp knife. 
  • When the pot is extremely hot, carefully place the dough in the pot, put the lid on and close the oven door.  Leave the temperature on high.
  • Twenty minutes later, take the lid off the pot and turn down the temperature to about 200C/395F.
  • After another 10 - 15 minutes, when the loaf is golden brown, remove the loaf from the oven onto a wire rack.
All our ovens are different, if you think the bread needs more time in the oven, leave it in. Check the loaf when you cut it and if it's slightly doughy in the centre, it will need an extra five minutes next time you bake it.

This bread is not sour dough but it's similar to sour dough. When the loaf is hot, the crust will be crusty and chewy like sour dough. The inside of the bread has a slightly chewy texture, also like sourdough. The bread can be eaten fresh or toasted.


This is one of the easiest loaves of bread you ever bake so even if you've never baked before, try this and see how you go. You never know, you may love baking and this might be the beginning of that. If you do bake the loaf, please take a photo and put it on your blog, then leave the link to the photo here so we can all visit and see your bread. If you don't have a blog, post the photo on the forum.  

Good luck, bakers!
SHARE:

22 July 2014

The wonderful possibilities of a simple life


Housework is boring!  Hmmm, yes, it might be. If I resented having to do housework, rushed through it so I could have time online or with my friends, or if I'd rather be out shopping, I'd think housework was irrelevant and holding me back. But I don't think of my home or the work I do here in that way. I see it as an opportunity. An opportunity to create the home I feel comfortable in, the home I want to raise children and grandchildren in; the home where I feel content just doing this and that and wandering around in my slippers. It's really all about the mindset. You either see your home as just a place to sleep and keep your belongings or you see it as your project - a beautiful work in progress. Taking control of a home can help you feel self-confident and strong, and if you get it right, it will give you a slow, sustainable life, full of wonderful possibilities.


All of us have to work. Not too many of us are born into wealthy families that allow us to do what we want to do every day. We learn very early to trade our life hours for money and to use that money to pay others to prepare food or us, to make our clothes, to produce the products we use in our homes. As the years roll on, many of us find a partner, have children and try to find a balance between what we have to do and what we want to do. Depending on circumstances, some leave work to raise their children and make their home the productive place they know it can be, while others continue working outside the home while treasuring those home hours and homemaking after work and on weekends.


When I left work many years ago, there was no emphasis on simple life. I didn't know what simple life was then, I just wanted to survive. My focus was in putting food on the table every day and saving money by changing the way I shopped for food. It didn't take me long to realise that the best use of the time I now had at home was to self-produce a lot of the things I used to pay for. If I could do that I'd have a very good chance of not only saving money, but supplying healthier food for my family.  So I was like a woman on a mission. I taught myself how to make bread, soap, laundry liquid, cleaners, jams, sauces, preserves, pasta and pickles. When I went shopping, I examined everything before I bought it. If there were too many chemicals and additives in it, I made it myself. Along the way I discovered there were quite a few things we didn't need at all. Doing all that saved a lot of money and I skilled myself to supply my family and home with much of what we needed. While all that was going on, I was smiling more, slowing down and learning to appreciate this calm and quiet safe haven I was living in. I had taken control of my home, turned it from a passive to an active dwelling and changed myself in the process. Doing the housework changed me and my life.


As I worked towards making my home more productive, I turned myself from a fairly sad, overworked, self-employed woman into a happy, energetic and fulfilled homemaker who brought real life back to my home. I felt powerful doing it too. I learned many basic skills, worked hard to improve every day, and every night I went to bed tired. And after a good night's sleep I jumped out of bed early the next morning, eager to do it all again. When Hanno retired and joined me we divided up the house and yard work and both settled into blissful contentment.  Mind you not everything went well.  When I made a mistake (and there were many), particularly when I was trying to learn something new, it made me stop and examine what I was doing, work out where I went wrong and then think about how to make it right. That kind of analytical thinking helped a lot and those lessons were the most valuable because I never forgot them. Mistakes might be annoying but never waste the opportunity to learn from them.


This way of life is very personal. It's all to do with family and what we eat, drink, sleep on, wear, wash, grow and love. Whatever we do here affects and benefits all of us. It's the opposite of a mainstream kind of life that is concerned with shopping and acquisition.  Mainstream life is more about being influenced by what is outside ourselves and our homes. It is rarely personal, it focuses on possessions, status, popularity and living large in a public world.


If you're at a crossroads and not sure how to change your life, start with something that you're currently concerned about. If you're worried about money, start with a budget and re-think how to do your grocery shopping. Paying off debt is key to this way of life. If you want to eat healthier food, start by learning how to cook and bake from scratch. If you want to grow food, start learning how by finding a community garden or a neighbour or friend to teach you. Doing these things for yourself will bring you back to your home and all the goodness that flows from that. I promise you that once you take that first step, life will open up and it will be quite obvious what your next step should be. Just follow that path. It will be long and windy, there will be hills and quite strolls in the park, but it will always be an interesting journey. A journey with no end.


I am a vital part of our home life, I know that. I feel valued and appreciated. I feel the same about Hanno and the work he does. We back ourselves, we're self-reliant and independent. Our work helps make the life we've both decided we want to live and as we slowly transition into older age, this kind of home is ideal for us.  Of course we'll have to modify a few of the more strenuous things when we see the need, but I can see us both living here for many years to come. And bored? Nope, I'd have to be bored with life to be bored with living as we do and I can't see that happening. 
SHARE:

21 July 2014

Changeable, seasonal and creative

We had lunch with Kerry, Sunny and Jamie last Friday when we invited them to join us at a German restaurant up in the mountains. It was really cold, with a cruel wind, but in that restaurant, perched on the mountainside looking out over the range below and the Pacific Ocean beyond, we had a fire blazing, hot food and good company. It was a delightful lunch and a good way to celebrate Kerry's birthday. He'll be back at work for his birthday next weekend, so we got in early.

There was a time when we always had two Airedales in the back yard. Now I only have this one little one, a gift Hanno bought me when we lived in Germany. He's a Steiff Airedale.

Our weekend here was a pleasant mix of work and relaxation. I have been knitting a mitten for Hanno's damaged right hand. He nearly cut that hand off with a chainsaw a couple of years ago, and although he has almost the full use of the hand, the circulation is quite poor and his hand is always cold. This mitten, knitted in double strand baby alpaca should keep it warm on even the coldest days. I've also made a little rice bag to slip into the mitten.

Wool scarf knitting from a couple of weeks ago. This is New Zealand pure wool and organic red fine wool.


My weekend cooking was really quick and easy. I made a five minute loaf on Saturday to have with the vegetable soup I made. That bread is so delicious and it takes next to no time at all to make. If you're new to baking, I'll go over the recipe later in the week and hopefully encourage the young readers out there to put on their aprons and bake some bread. Baking is one of those simple life skills we all should have.


Hanno didn't share the soup because he cooked his German speciality grünkohl und schweinefleisch - kale and pork (above). No doubt there are many different ways to make this recipe. Hanno does it the way his mother taught him, which was probably what she was taught by her mother. It's a mix of smoked pork sausage, pork knuckle and bacon, cooked with onions, kale and potatoes and thickened slightly with oats. He makes a big pot at least once a year, in winter, and it takes him about four or five days to work his way through it. He tells me it gets better every day. :- )

My soap from yesterday, just about to be poured into moulds.

Sunday morning had me back in the kitchen again, this time making a batch of soap. I changed my recipe, slightly, this time. That's big for me. I'm a plain and simple woman and usually when I find something I like, that's it, it's mine forever; I see no need for change.  But both Hanno and I have sensitive skin which seems to be worsening as we age. We need our daily soap to be wholesome nourishing soap, containing only natural ingredients. The bulk of my recipe is Australian extra virgin olive oil, with a smaller amount of olive oil infused with calendula petals, and organic coconut oil. I have to leave it to cure for a few weeks but I think I'm on to a winner.  It looks and feels very creamy. I'll go through the recipe with you next week.

It's satisfying and comforting working in my kitchen, producing what I need for my family and myself. There seems to be a view that women who work at home have no power and their work is monotonous. I think the opposite is true. There is true power in taking control of a household and running it to suit the exact needs of the people who live there. The work we do here helps us live an unorthodox life that is enriching because it's so changeable, seasonal and creative. I doubt you get that in most jobs. Most paid occupations are a set group of skills that must be performed to a set standard over and over again. I was thinking about that while I worked on my various tasks on the weekend. Tomorrow I'll be writing about the powerhouse we can all create in our own homes but in the meantime, what did you do on the weekend?

SHARE:

18 July 2014

Weekend reading


I hope you have a restful weekend ahead and are able to spend time with people you love. Thank you for all your wonderful comments. Most of the time I don't have time to reply but I want you to know the comments often make me smile and sometimes make me frown, but they always make me appreciate the time you take to reach out. It's an important part of the blog for me and I appreciate having you here to share that. No person is an island and my blog works at its best when commentary is coming in with ideas and encouragement being shared.

Stay warm, or cool, wherever you are, and enjoy the weekend.  

 ❤ 


No-poo experiment six months later
DIY sunscreen recipes
Over 60% of breads sold in the UK contain pesticide residues
Organic food better
Rent a wife
Better off renting?
Best before dates
Greening your kitchen
11 ways to green your laundry
How to green your cleaning routine
Essence of Permaculture by David Holmgren. A free download in several languages.
Uh oh, it's me again. This time on ABC Radio 612 with Chris Welsh, and broadcast state-wide in Queensland on Wednesday evening.
SHARE:

17 July 2014

Food waste and how to avoid it

The rate of food wastage in many Western countries, including Australia, is shameful. The current estimation is that about 30 percent of the food we buy is wasted. That is just plain crazy. If you can organise yourself to not waste any food, you'll have money to pay off debt, to save or use to buy something you need. I think the main problem is a general lack of skills when it comes to selecting fresh food in the shops and then storing it correctly at home. Luckily these are skills anyone can learn.

If food spoils before you've had a chance to eat it then it might be wise to rethink your food buying and storage strategy. If food is stored in the fridge and sits there until it looks unusable or the use by date tell you it's not safe to eat it, then you're probably buying too much food, or at least the wrong kind of food.


Either way, you have to get rid of spoiled food. It either goes in the bin for transport to land fill or to the compost heap if you've got one set up. Maybe some of it can be given to the chickens but never give them food with mould or fungus on it. Often the compost heap is the only option. You don't need to have a working vegetable garden to have a compost heap. Composting your food waste is far better than sending it to land fill. Taking care of your own perishable rubbish, makes you more self-reliant and independent. Even if that compost heap sits there and the compost is never used, if it just decomposes and enriches the soil beneath it, it's a far better option than sending your food waste to the tip.

Our compost heap is a very simple affair - just lawn clipping, green leaves, fruit and potato peels, paper and old straw from the chicken pen etc, thrown together in a pile and kept moist. Over the weeks and months it will decompose.

To set up a compost heap, find a space on garden soil away from the house so you don't have to look at it all the time. If you have three sides holding the food waste in, that's ideal, but it can be done without it.  Just add your food scraps as you have them, add pieces of cardboard, shredded or ripped paper, old envelopes, contents of the vacuum cleaner, old pieces of cotton, wool and linen, cuttings from the garden and lawn clippings. You can add anything that has once been alive but do not add dairy products or meat/fish of any kind. That will attract rats and mice. When you've added the food waste, try to cover the heap with a layer of lawn clippings or cardboard. That will stop any smells and will keep the heap safe from visiting birds. When it's dry, hose the heap. It should be kept moist but not wet. If you do that, you'll be able to compost your own food and some household waste and save it from going to landfill. A worm farm will do a similar thing but it will use much less waste.

Even though you add to the compost heap all the time, it should be decomposing and therefore shrinking in size. But if the heap does grow a little and you're making good compost, get a spade and throw it around on your lawn or ornamentals plants to use it up.

The other great strategy to reduce food waste is to plan your menus every week. If you're only buying what you need for that week's meals, you'll have less waste (and more money).  There are many posts at the forum about menu planning. If you don't know what to do, read some of the posts, or ask someone to help.


Many people recommend growing your own fruit and vegetables but make sure that is a viable option before you start.  If you're starting from scratch and have to buy soil or enrich virgin soil, build or buy raised beds, fertiliser, seeds and seedlings, sometimes it doesn't make financial sense. If you want to start raising vegetables, start small - with easy vegetables such as lettuce, carrots and beans and build up your crops and skills each year. And don't just learn about planting and varieties, learn about harvesting, storing and preserving food as well. You'll do yourself no good if you grow a great crop of all the vegetables you want to eat but then waste a lot of them because you don't know how to store or preserve them.

If you can't use all your lemons, juice them and freeze the juice. I make lemon cordial during the summer months with our frozen lemon juice.

You need to be proactive when you produce food at home. If you're growing lemons, collect recipes for lemon dishes so you can use the lemons when you have an abundance, and you will have. If you don't want to use all of them, find someone to barter with. Almost everyone wants lemons, you won't have any trouble swapping them for something you want.  The same goes for everything you're growing. Know what you'll do with it when you have a small amount or a large amount.  Learn the skill before you need to use it. It is this kind of thinking that allows some homemakers and gardeners to get ahead while others struggle.

Learn how to make leftovers into something delicious on the second or third day. You'll save yourself the cost of making another meal from scratch, you'll save the electricity it would take to cook it and the time it takes to cook from scratch. Above all else though, you'll be building up your skills and fully utilising the food you have on hand. That skill might make or break you one day.

 Find some good recipes for using leftovers, then use them.

  • Clean out your crisper bins in the fridge before you shop. Use the vegetables and fruit that are still in there before you buy a new batch. Vegetables can be used to make a soup or casserole and that will be one less meal you have to shop for.
  • Have a plan for leftovers. Stretching a meal from one to two or three days is a skill we can all develop.
  • If produce needs to be stored in a certain way, do it.
  • Don't store potatoes or onions in plastic bags, they'll rot.
  • Wrap celery in aluminium foil - it will keep well for six weeks, still crisp.
  • Most vegetables store better in sealed plastic bags rather than just being open in the crisper.
  • Don't overstock your stockpile.
  • Buy only what you know you'll eat.
I wonder how you manage food in your home. Do you have any clever tips and hints to add to this list? I'd love to hear them.

SHARE:

15 July 2014

Simple life on the radio

My series of ABC radio talks is continuing but I forgot to give you the links the last three weeks. Here they are:
Please note, I wrongly gave double the amount of ingredients when I was talking about the laundry liquid. You should halve the amounts if you want to make it. The instructions are here.


After deteriorating quite suddenly over the past few days, our little blind chook, Lucy, died yesterday. :- (   It's something all chicken keepers have to deal with but it's never easy when it happens. That is Lucy above, sitting on one of her many secret nests.

SHARE:

14 July 2014

The winter kitchen

This winter has been the coldest winter in a long time in many parts of Australia. Where I live, we usually have a sprinkling of days in July and August when the night time temperature falls to about three or four degrees. This year we've had much more than that, and colder. Right now we're at the end of a two week run of cold nights and winds that go right through you. Australian houses where I live are set up for the heat rather than the cold. We don't have an open fire or a heater as such; we have reverse cycle air conditioning but I don't like using it. Hanno and I disagree on the safety of wood burning stoves. I would like to have one for winter warmth, he thinks they're polluting and unhealthy.


So in times such as these, when winter winds make us all rug up, I turn to my kitchen for warmth. I make casseroles, soups, roasts and other slow cooking meals that give the impression of warmth when it's cooking, then fulfils the promise when we eat it. So far, it's kept me going.

The one dish I keep returning to on very cold days is beef casserole. It's easy to prepare, nutritious, hearty and when I cook it in the slow cooker, it takes only about 20 minutes to prepare. If you're working outside the home on these cold winter days, there would be nothing better than this dish to welcome you back home at night. If you could prepare this meal on a Sunday afternoon, and make a double portion, you'd have two excellent winter warmer meals for two of your work days during the week.  

I know there are quite a few readers who don't cook much. I had an email from a young man last week who told me that it's been two years since he left home and he's only cooked three meals. I want you all to try this so I'm giving basic instructions for all the new cooks. Following this recipe will give you a superb meal that can be the basis of your expanding recipe file.  Here's is the step-by-step guide on how to do it.

This ingredients list is based on a family of four to eight, depending on ages. Please adjust to your own circumstances but remember, even if it's just one or two in your family, this will sit very well in the fridge for two days or it can be frozen in portions and eaten later.
You'll need:
  • about 1kg/2.2lbs gravy beef, shin beef or blade steak - cut in 5 cm/2 inch squares. Meat cooked slowly will shrink and having the meat in bigger portions helps it stay moist.
  • 2 medium onions, peeled and cut into quarters
  • 2 large carrots, peeled and cut into 5cm/2 inch pieces
  • 2 sticks of celery, cut into 5cm/2 inch pieces
  • 2 cloves garlic, peeled and crushed
  • salt and pepper to taste
  • 2 tablespoons plain/all purpose flour
  • two tablespoons paprika - you could substitute chilli, curry power or curry paste
  • ½ cup chopped parsley

Optional extras: if you have vegetables in the fridge that have to be eaten, this is the ideal dish to add them to. Any of these would be ideal - capsicum/pepper, zucchini, turnips, parsnips, a small amount of cabbage, cauliflower, kale, silverbeet/chard, Brussel sprouts, sweet potato, potatoes.

On Sunday afternoon, or in the morning before you go to work: 
  1. Cut the meat into large squares.
  2. Place plain flour, salt, pepper, paprika (or chilli/curry) into a bowl and mix.
  3. Coat the meat in the seasoned flour.
  4. Put a large frying pan on the stove and add two tablespoons of cooking oil. I use virgin olive oil. When the oil is hot, but not smoking, add half the meat and brown it on all sides. Remove the meat and repeat with the other half. Remove the meat. Remember, you're just browning the outside of the meat at this point. You're not cooking it. Browning the meat will give the casserole a deep, rich flavour, so don't skip this step.
  1. Into the same pan, add all the vegetables and brown them for about five minutes. 
  2. If there is any seasoned flour left over, add it and mix it in.
  3. Add the meat back to the pan with the vegetables. At this point, it should look like the photo above.
  1. Pour over enough water to just cover the meat. Not too much water, just enough to cover.
  2. Stir the meat until the sauce starts to thicken.
  3. When the sauce is thick, pour the casserole into your slow cooker, add the parsley and put the lid on. Remember, nothing is cooked at this stage. You've just developed the flavours and caramelised your ingredients. They will cook in the slow cooker.
  1. If you're doing this on Sunday, place the inner part of the slow cooker in the fridge at this point. Tomorrow morning as soon as you get up, take it out of the fridge and sit it on the bench for a while so it's not going on the heat straight from the fridge. Take no notice of this step if you're cooking it straight away.
  2. When you're ready to cook the casserole, turn the slow cooker onto the low setting if you're going to leave it all day, or high if you want to eat the meal in about four hours.
  3. Place the lid on. Make sure there is nothing touching the slow cooker - no tea towel or plastic cups etc.
This must cook for at least four hours but can be left all day or overnight on a low setting if you prefer. Depending on what vegetables you've included, you won't have to add anything else. But if you want to bulk this meal out a bit for the men and boys in the family you could serve it with rice, buttered noodles, dumplings, mashed potato or crusty bread.  The beauty of this dish is that when you walk into your home after a hard day's work, you'll smell this cooking and you'll know you have a hearty meal ready to serve when you're ready to eat it. Ask everyone to put away their coats and bags, wash their hands, and get the children to set the table while you're mashing the potatoes and pouring the drinks.

Any leftover casserole can be placed in a covered bowl for eating tomorrow or in a freezer bag or container for eating at another time. I hope you enjoy it. Next week, I'll share an equally delicious chicken meal that can be cooked while you're out at work or busy at home with other things.


SHARE:

11 July 2014

Weekend reading

Here she is! Born on Wednesday to Danny and Laura.

We've had very cold days and nights here in many parts of Australia. There has been record snow falls in the alps and strong winds. I hope you're staying warm. For all my friends experiencing summer in other parts of the world, I hope it's not too hot for you and you're enjoying clinking ice cubes in your cold drinks. Enjoy the weekend, everyone!

Power to the people - I'm not sure if anyone outside Australia will be able to watch this but all Australians should. - Hanno's recommendation
Knitting with rags - floor rug project
Work Shop - getting people together
Koala video - watch it to the end, very cute
Using leftover risotto - I guess there must be leftover risotto somewhere in the world ;- )
Ideas for leftover milk, or in the case of many of you reading here, ideas for the height of milking season
Will switching to a water meter save money? In England and Wales your water company is obliged to install a water meter free of charge if you ask
Ten tips for cross stitchers
SHARE:

10 July 2014

A new baby!

I am very proud and happy today. We have a new baby in our family - Tricia has a grand daughter! Congratulations Daniel and Laura on the birth of your little girl. The first girl to be born in our part of the family for more years than I care to remember. 

I have no recent photos of Danny and Laura but here is a photo of them both with Tricia when their son Johnathan was born in 2012.

Born in Sydney last night, about five weeks premature, by Caesarian, the baby is fine but Laura has high blood pressure. Danny was at her side during the birth. I'm sure I'll hear more news later. In the meantime, I'm smiling every time I think of that baby girl, and Tricia.
SHARE:

9 July 2014

Make your own family traditions

I had an email from a young woman the other day who told me she had suffered significant abuse when she was growing up and had severed all ties with her family. She said she was doing well now, had embraced simple life, had a good job, had recently married and was looking forward to the birth of her first baby next month. Being a soon-to-be first time mother made her wonder about family traditions and what she should be passing on to her children.  Having the history she has, she doesn't want to carry on any of her family traditions but wants a thread of family history to run through her new family. What could she do?

I told her she should start her own traditions.


When you think about it, every tradition, whether very grand or the small family traditions most of us enjoy, starts because one person decided it was important enough to continue and connect families over the years. We can all be that person, we can all start our own family traditions.


The easy and obvious ones are attached to the holidays - Christmas, Hanukkah, Chinese New Year etc. Often these involve large family gatherings and food, specific to that time of year. In my home, we've embraced some aspects of traditional religious holidays and mixed them with things that we wanted to include. We observe some traditions from Hanno's culture and some from mine. It doesn't have to be the same for all families. It just has to be right for yours. So with these traditions, think about what the tradition is, then modify it to suit you and your family. After that, you just have to do it.

You could easily start small family traditions such as dad reading to the children before bed. My father used to do that and I read to my sons. Go camping at Easter time or at the same time during the year when you always have a few days off. Enter food in the local show/fair using some of grandma's old recipes and see if you can improve every year. Get the kids involved too. Start some food traditions. Not just in what you eat but in preparing the food as well. Start a family preserving day where you invite all the willing members of your family to bring over a box of tomatoes or fruit and then cook and bottle sauce or jam for later in the year. Those traditions can become much loved family events where family stories and history are passed on.


A very worthwhile tradition is everyone gathering at the kitchen table to eat the main meal of the day. It is there we can really connect with our children and share what's happening today and next week. Make sure there are no phones at the table and if yours rings, don't answer it. If you're trying to teach your teens that their phone isn't as important as the family meal time, you have to reinforce that by ignoring your phone while you're seated at the table.


We all benefit from traditions. Whether it's because they give us a feeling of belonging to a particular family or because they create a bond between everyone that nothing will break. Traditions can help make us stronger and feel safe and secure, not only in ourselves but as a family group as well.

So to that young woman, I encourage you to look at what you do throughout the year and mark the important days with your own traditions. I can't think of a better time to do it than when a new baby is born into the family - it's a new life in so many ways.

What are your family traditions? Did you start any new traditions of your own?

SHARE:
Blogger Template by pipdig